
Accessing the Signatures screen
- Click the Office tab in the top navigation bar.
- Click the Signatures option.
The Signatures screen shows all documents you have sent via Signable or DocuSign. Filters at the top of the page allow you to view pending or completed documents.
Sending a document for e-signature
To generate a new envelope for signing:
- On the Signatures screen, click the button in the top right-hand corner to create a new envelope.
- You can search for the document recipient by looking under a person's profile, a tenancy, or a sales property — select the relevant option to locate your recipient.
- Once you have selected a person or tenancy, the system will open a new tab with the envelope details.
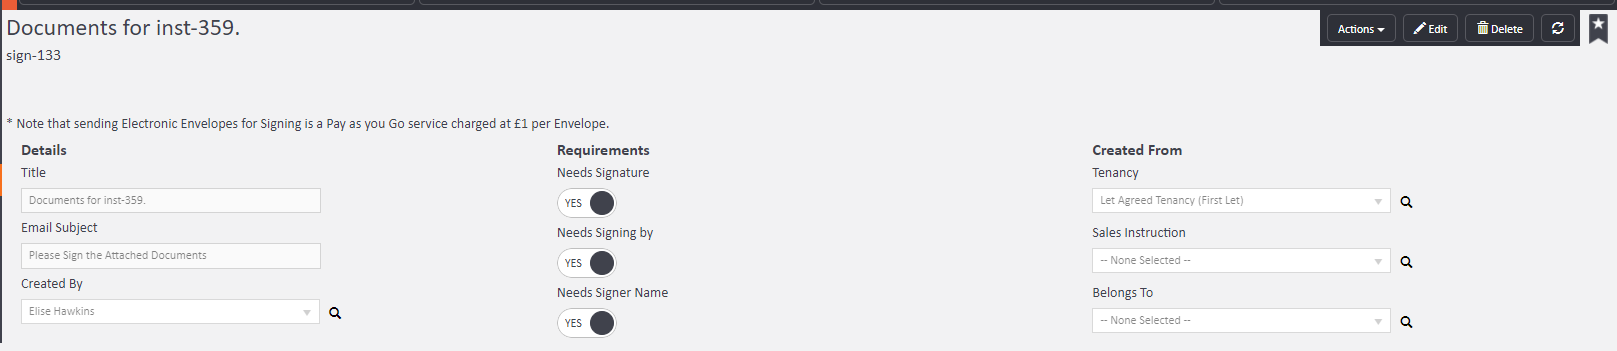
Configuring the envelope
On the envelope details screen, you can set the following requirements:
- Needs Signature — whether a signature is required
- Needs Signing By — who is required to sign
- Needs Signer Name — whether the signer's name must be included
You can also update:
- Title — the name of the document
- Email Subject — the subject line of the email sent to recipients
- Created By — the staff member creating the envelope
- Created From — the tenancy or record the document relates to
- Sales Instruction and Belongs To fields as appropriate
Selecting documents to sign
Once your recipients are confirmed, use the left-hand menu to select Documents to Sign or Letters to Sign.
Click on the desired option. In the top right-hand corner, you will see three options — choose the appropriate one for your document type.


At this stage, you can also add additional documents to the envelope from your computer (such as How to Rent guides, EPC certificates, Gas Safety certificates, and so on).
Sending the envelope
Once you have chosen your document type and added any additional documents:
- Click the Actions button in the top right-hand corner.
- Select Send Out for Signing.
The document will be sent to your client by email. You can then see the envelope on the front screen of the Signatures page.

Tracking and completing envelopes
As soon as the document has been signed, the status on the Signatures screen will update to reflect this.
When a tenant or other party returns the signed document, it will show as Completed on this screen. You will then be able to download the Signing Certificate by clicking the Actions button on the completed envelope.
You can then upload the signed document to the relevant tenancy under the print/post/store documents section.
If you need any assistance, contact support@agentos.com.